Creating a part
This section includes an example that shows how you can use an Abaqus/CAE script to replicate the functionality of Abaqus/CAE.
The example script
This example shows how you can use an Abaqus/CAE script to replicate the functionality of Abaqus/CAE.
The script does the following:
Creates a new model in the model database.
Creates a two-dimensional sketch.
Creates a three-dimensional, deformable part.
Extrudes the two-dimensional sketch to create the first geometric feature of the part.
Creates a new viewport.
Displays a shaded image of the new part in the new viewport.
The new viewport and the shaded part are shown in Fig. 5.
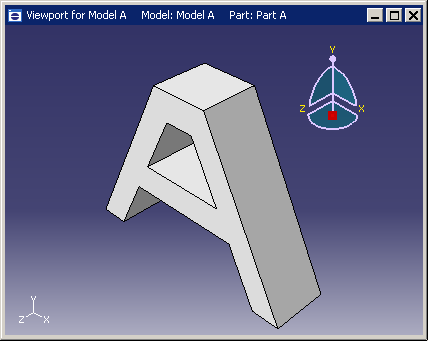
Fig. 5 The example creates a new viewport and a part.
The example scripts from this guide can be copied to the user’s working directory by using the Abaqus fetch utility:
abaqus fetch job=scriptName
where scriptName.py is the name of the script (see Fetching sample input files). Use the following command to retrieve the script for this example:
abaqus fetch job=modelAExample
Note
Abaqus does not install the sample scripts by default during the installation procedure. As a result, if the Abaqus fetch utility fails to find the sample script, the script may be missing from your Abaqus installation. You must rerun the installation procedure and request Abaqus sample problems from the list of items to install.
To run the program, do the following:
Start Abaqus/CAE by typing abaqus cae.
From the startup screen, select Run Script.
From the Run Script dialog box that appears, select modelAExample.py.
Click OK to run the script.
Note
If Abaqus/CAE is already running, you can run the script by selecting from the main menu bar.
The example follows:
"""
modelAExample.py

A simple example: Creating a part.
"""

from abaqus import *
from abaqusConstants import *

backwardCompatibility.setValues(includeDeprecated=True, reportDeprecated=False)

import sketch
import part

myModel = mdb.Model(name="Model A")

mySketch = myModel.ConstrainedSketch(name="Sketch A", sheetSize=200.0)

xyCoordsInner = ((-5, 20), (5, 20), (15, 0), (-15, 0), (-5, 20))

xyCoordsOuter = (
    (-10, 30),
    (10, 30),
    (40, -30),
    (30, -30),
    (20, -10),
    (-20, -10),
    (-30, -30),
    (-40, -30),
    (-10, 30),
)

for i in range(len(xyCoordsInner) - 1):
    mySketch.Line(point1=xyCoordsInner[i], point2=xyCoordsInner[i + 1])

for i in range(len(xyCoordsOuter) - 1):
    mySketch.Line(point1=xyCoordsOuter[i], point2=xyCoordsOuter[i + 1])

myPart = myModel.Part(name="Part A", dimensionality=THREE_D, type=DEFORMABLE_BODY)

myPart.BaseSolidExtrude(sketch=mySketch, depth=20.0)

myViewport = session.Viewport(
    name="Viewport for Model A", origin=(10, 10), width=150, height=100
)

myViewport.setValues(displayedObject=myPart)

myViewport.partDisplay.setValues(renderStyle=SHADED)
How does the script work?
This section explains each portion of the example script.
from abaqus import *
This statement makes the basic Abaqus objects accessible to the script. It also provides access to a default model database using the variable named mdb. The statement, from abaqusConstants import *, makes the Symbolic Constants defined by the Abaqus Scripting Interface available to the script.
import sketch
import part
These statements provide access to the objects related to sketches and parts. sketch and part are called Python modules.
The next statement in the script is shown in Fig. 6. You can read this statement from right to left as follows:
Create a new model named Model A.
Store the new model in the model database mdb.
Assign the new model to a variable called myModel.
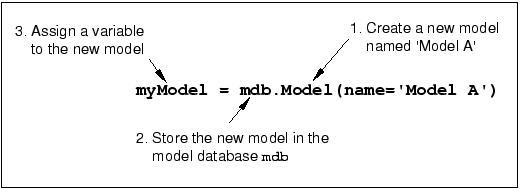
Fig. 6 Creating a new model.
mySketch = myModel.ConstrainedSketch(name="Sketch A", sheetSize=200.0)
This statement creates a new sketch object named Sketch A in myModel. The variable mySketch is assigned to the new sketch. The sketch will be placed on a sheet 200 units square. Note the following:
A command that creates something (an “object” in object-oriented programming terms) is called a constructor and starts with an uppercase character. You have seen the Model and Sketch commands that create Model objects and Sketch objects, respectively.
The command uses the variable myModel that we created in the previous statement. Using variables with meaningful names in a script makes the script easier to read and understand.
xyCoordsInner = ((-5, 20), (5, 20), (15, 0), (-15, 0), (-5, 20))

xyCoordsOuter = (
    (-10, 30),
    (10, 30),
    (40, -30),
    (30, -30),
    (20, -10),
    (-20, -10),
    (-30, -30),
    (-40, -30),
    (-10, 30),
)
These two statements define the X- and Y-coordinates of the vertices that form the inner and outer profile of the letter A. The variable xyCoordsInner refers to the vertices of the inner profile, and the variable xyCoordsOuter refers to the vertices of the outer profile.
This loop creates the inner profile of the letter A in mySketch. Four lines are created using the X- and Y-coordinates of the vertices in xyCoordsInner to define the beginning point and the end point of each line. Note the following:
Python uses only indentation to signify the start and the end of a loop. Python does not use the brackets {} of C and C++.
The
len()function returns the number of coordinate pairs in xyCoordsInner—five in our example.The
range()function returns a sequence of integers. In Python, as in C and C++, the index of an array starts at zero. In our example range(4) returns 0,1,2,3. For each iteration of the loop in the example the variable i is assigned to the next value in the sequence of integers.
Similarly, a second loop creates the outer profile of the A character.
myPart = myModel.Part(name="Part A", dimensionality=THREE_D, type=DEFORMABLE_BODY)
This statement creates a three-dimensional, deformable part named Part A in myModel. The new part is assigned to the variable myPart.
myPart.BaseSolidExtrude(sketch=mySketch, depth=20.0)
This statement creates a base solid extrude feature in myPart by extruding mySketch through a depth of 20.0.
myViewport = session.Viewport(
    name="Viewport for Model A", origin=(20, 20), width=150, height=100
)
This statement creates a new viewport named Viewport for Model A in session. The new viewport is assigned to the variable myViewport. The origin of the viewport is at (20, 20), and it has a width of 150 and a height of 100.
myViewport.setValues(displayedObject=myPart)
This statement tells Abaqus to display the new part, myPart, in the new viewport, myViewport.
myViewport.partDisplayOptions.setValues(renderStyle=SHADED)
This statement sets the render style of the part display options in myViewport to shaded. As a result, myPart appears in the shaded render style.