Reading from an output database
The following sections describe how you use Abaqus C++ API commands to read data from an output database.
The Abaqus/CAE Visualization module tutorial output database
The following sections describe how you can access the data in an output database. Examples are included that refer to the Abaqus/CAE Visualization module tutorial output database, viewer_tutorial.odb. This database is generated by the input file from Case 2 of the example problem, Indentation of an elastomeric foam specimen with a hemispherical punch. The problem studies the behavior of a soft elastomeric foam block indented by a heavy metal punch. The tutorial shows how you can use the Visualization module to view the data in the output database. The tutorial describes how you can choose the variable to display, how you can step through the steps and frames in the analysis, and how you can create X - Y data from history output.
You are encouraged to copy the tutorial output database to a local directory and experiment with the Abaqus C++ API. The output database and the example scripts from this guide can be copied to the user’s working directory using the abaqus fetch utility:
abaqus fetch job=name
where name.C is the name of the program or name.odb is the name of the output database (see Fetching sample input files). For example, use the following command to retrieve the tutorial output database:
abaqus fetch job=viewer_tutorial
Making the Odb commands available
To make the Odb commands available to your program, you first need to include the output database interface classes using the following statement:
#include <odb_API.h>
To make the material and section Odb commands available to your program, you also need to include their output database classes:
#include <odb_MaterialTypes.h>
#include <odb_SectionTypes.h>
Opening an output database
You use the openOdb method to open an existing output database. For example, the following statement opens the output database used by the Abaqus/CAE Visualization module tutorial:
odb_Odb& odb = openOdb("viewer_tutorial.odb");
After you open the output database, you can access its contents using the methods and members of the Odb object returned by the openOdb method. In the above example the Odb object is referred to by the variable odb. For a full description of the openOdb command, see openOdb().
The following list describes the objects in model data and the commands you use to read model data. Many of the objects are repositories, and you will find it useful to use the repository iterators to determine the keys of the repositories. For more information on repositories and sequences, see Utility interface.
The root assembly
An output database contains only one root assembly. You access the root assembly through the OdbAssembly object.
odb_Assembly& rootAssy = odb.rootAssembly();Part instances
Part instances are stored in the instance repository under the OdbAssembly object. The following statements display the repository keys of the part instances in the tutorial output database:
odb_InstanceRepositoryIT instIter(rootAssy.instances());
for (instIter.first(); !instIter.isDone(); instIter.next()) cout << instIter.currentKey().CStr() << endl;
The output database contains only one part instance, and the resulting output is
PART - 1 - 1From a part instance or part you can retrieve the node and element information as follows:
{
    odb_Instance& instance1 = rootAssy.instances()["PART-1-1"];
    odb_Enum::odb_DimensionEnum instanceType = instance1.embeddedSpace();
    const odb_SequenceNode& nodeList = instance1.nodes();
    int nodeListSize = nodeList.size();
    if (instanceType == odb_Enum::THREE_D) {
        for (int n = 0; n < nodeListSize; n++) {
            const odb_Node node = nodeList[n];
            int nodeLabel = node.label();
            const float* const coord = node.coordinates();
            cout << "Xcoord: " << coord[0] << " , Ycoord: " << coord[1] << " , Zcoord: " << coord[2] << endl;
        }
    } else if ((instanceType == odb_Enum::TWO_D_PLANAR) || (instanceType == odb_Enum::AXISYMMETRIC)) {
        for (int n = 0; n < nodeListSize; n++) {
            const odb_Node node = nodeList[n];
            int nodeLabel = node.label();
            const float* const coord = node.coordinates();
            cout << "Xcoord: " << coord[0] << " , Ycoord: " << coord[1] << endl;
        }
    }

    const odb_SequenceElement& elementList = instance1.elements();
    int elementListSize = elementList.size();
    cout << "Element Connectivity Data" << endl;
    cout << "Element Label : constituent node labels ..." << endl;
    int numNodes = 0;
    for (int e = 0; e < elementListSize; e++) {
        const odb_Element element = elementList[e];
        int elementLabel = element.label();
        cout << elementLabel << " : ";
        odb_String elementType = element.type();
        const int* const conn = element.connectivity(numNodes);
        for (int j = 0; j < numNodes; j++) cout << "  " << conn[j];
        cout << endl;
    }
}
Regions
Regions in the output database are OdbSet objects. Regions refer to the part and assembly sets stored in the output database. A part set refers to elements or nodes in an individual part and appears in each instance of the part in the assembly. An assembly set refers to the elements or nodes in part instances in the assembly. A region can be one of the following:
A node set
An element set
A surface
For example, the following statement displays the node sets in the OdbAssembly object:
cout << "Node set keys:" << endl;
odb_SetRepositoryIT setIter(rootAssy.nodeSets());
for (setIter.first(); !setIter.isDone(); setIter.next()) cout << setIter.currentKey().CStr() << endl;
The resulting output is
Node set keys : ALL NODESThe following statements display the node sets and the element sets in the PART-1-1 part instance:
{
    odb_InstanceRepository& iCon = odb.rootAssembly().instances();
    odb_Instance& instance = iCon["PART-1-1"];

    cout << "Node set keys:" << endl;
    odb_SetRepositoryIT setItN(instance.nodeSets());
    for (setItN.first(); !setItN.isDone(); setItN.next()) cout << setItN.currentKey().CStr() << endl;

    cout << "Element set keys:" << endl;
    odb_SetRepositoryIT setItE(instance.elementSets());
    for (setItE.first(); !setItE.isDone(); setItE.next()) cout << setItE.currentKey().CStr() << endl;
}
The resulting output is
Node set keys : BOT N481 TOP N1... Element set keys : CENT FOAM...The following statement assigns a variable (topNodeSet) to the ‘TOP’ node set in the PART-1-1 part instance:
odb_InstanceRepository& iCon = odb.rootAssembly().instances();
odb_Instance& instance = iCon["PART-1-1"];
odb_Set& topNodeSet = instance.nodeSets()["TOP"];
The type of the object to which topNodeSet refers is OdbSet. After you create a variable that refers to a region, you can use the variable to refer to a subset of field output data, as described in Using regions to read a subset of field output data.
To access the set information on a part instance:
// node set information

odb_Set& nodeSet = instance.nodeSets()["CENTER"];
const odb_SequenceNode& nodeList = nodeSet.nodes();

// surface information
odb_Set& surface = instance.surfaces()["IMPACTOR"];
const odb_SequenceElement& elementList = surface.elements();
const odb_SequenceElementFace& faces = surface.faces();

// iterators are used to get all sets
odb_SetRepository& elementSetRepository = instance.elementSets();
odb_SetRepositoryIT elSetRepIter(elementSetRepository);
for (elSetRepIter.first(); !elSetRepIter.isDone(); elSetRepIter.next()) {
    odb_Set& set = elementSetRepository[elSetRepIter.currentKey()];
    cout << "element set " << elSetRepIter.currentKey().CStr() << endl;
    cout << "        number of elements : ";
    cout << set.size() << endl;
}
The set information in an assembly set is keyed by instance name and can be accessed using the following:
// assembly surface information
odb_Set& aSurface = rootAssy.surfaces()["TARGET"];
odb_SequenceString instanceNames = aSurface.instanceNames();
int totalNames = instanceNames.size();
for (int name = 0; name < totalNames; name++) {
    const odb_String& iName = instanceNames[name];
    const odb_SequenceElement& els = aSurface.elements(iName);
    const odb_SequenceElementFace& face = aSurface.faces(iName);
}
Materials
You can read material data from an output database.
Materials are stored in the materials repository under the Odb object.
Extend the Material commands available to the Odb object using the following statement:
odb_MaterialApi materialApi;
odb.extendApi(odb_Enum::odb_MATERIAL, materialApi);
Access the materials repository using the command:
odb_MaterialContainer& materialContainer = materialApi.materials();
odb_MaterialContainerIT matIT(materialContainer);
for (matIT.first(); !matIT.isDone(); matIT.next()) {
    cout << "Material Name : " << matIT.currentKey().CStr() << endl;
    const odb_Material& myMaterial = matIT.currentValue();
}
To print isotropic elastic material properties in a material object:
odb_Elastic elastic = myMaterial.elastic();
if (elastic.hasValue()) {
    if (elastic.type() == "ISOTROPIC") {
        cout << "isotropic elastic behavior, type = " << elastic.moduli().CStr() << endl;
        odb_String tableHeader("Youngs modulus   Poisson's ratio ");
        if (elastic.temperatureDependency()) tableHeader.append("Temperature  ");
        for (int i = 0, max = elastic.dependencies(); i < max; ++i) tableHeader.append(" field # ").append(i);
        cout << tableHeader.CStr() << endl;
        odb_SequenceSequenceFloat table = elastic.table();
        for (int r = 0, rows = table.size(); r < rows; ++r) {
            const odb_SequenceFloat& data = table[r];
            for (int c = 0, cols = data.size(); c < cols; ++c) {
                cout << data[c] << "   ";
            }
            cout << endl;
        }
    }
}
Some Material definitions have suboptions. For example, to access the smoothing type used for biaxial test data specified for a hyperelastic material:
odb_Hyperelastic hyperelastic = myMaterial.hyperelastic();
if (hyperelastic.hasValue()) {
    bool testData = hyperelastic.testData();
    odb_BiaxialTestData biaxialTestData = hyperelastic.biaxialTestData();
    odb_String smoothingType("smoothing type: ");
    if (biaxialTestData.hasValue()) {
        odb_Union smoothing = biaxialTestData.smoothing();
        switch (smoothing.type()) {
            case (odb_UNION_STRING):
                smoothingType.append(smoothing.getString());
                break;
            case (odb_UNION_INT):
                smoothingType.append(smoothing.getInt());
                break;
            case (odb_UNION_FLOAT):
                smoothingType.append(smoothing.getFloat());
                break;
            case (odb_UNION_DOUBLE):
                smoothingType.append(smoothing.getDouble());
                break;
            case (odb_UNION_BOOL):
                smoothingType.append(smoothing.getBool());
                break;
        }
        cout << smoothingType.CStr() << endl;
    }
}
Material describes the Material object commands in more detail; the odb_Union object is defined in Union object.
Sections
You can read section data from an output database.
Sections are stored in the sections repository under the Odb object.
Extend the Section commands available to the Odb object using the following statement:
odb_SectionApi sectionApi;
odb.extendApi(odb_Enum::odb_SECTION, sectionApi);
The following statements display the repository keys of the sections in an output database:
odb_SectionContainer& sectionContainer = sectionApi.sections();
odb_SectionContainerIT scIT(sectionContainer);
for (scIT.first(); !scIT.isDone(); scIT.next()) {
    cout << "Section Name : " << scIT.currentKey().CStr() << endl;
}
The Section object can be one of the various section types. The odb_isA method can be used to determine the section type. For example, to determine whether a section is of type homogeneous solid section and to print its thickness and associated material name:
for (scIT.first(); !scIT.isDone(); scIT.next()) {
    const odb_Section& mySection = scIT.currentValue();
    if (odb_isA(odb_HomogeneousSolidSection, mySection)) {
        odb_HomogeneousSolidSection homogeneousSolidSection = odb_dynamicCast(odb_HomogeneousSolidSection, mySection);
        odb_String material = homogeneousSolidSection.material();
        cout << "material name = " << material.CStr() << endl;
        float thickness = homogeneousSolidSection.thickness();
        cout << "thickness = " << thickness << endl;
    }
}
Similarily, to access the beam profile repository:
odb_ProfileContainer profileContainer = sectionApi.profiles();
int numProfiles = sectionApi.numProfiles();
cout << "Total Number of profiles in the ODB: " << numProfiles << endl;
The Profile object can be one of the various profile types. The odb_isA method can be used to determine the profile type. For example, to output the radius of all circular profiles in the odb:
odb_ProfileContainerIT pcIT(profileContainer);
for (pcIT.first(); !pcIT.isDone(); pcIT.next()) {
    const odb_Profile& myProfile = pcIT.currentValue();
    if (odb_isA(odb_CircularProfile, myProfile)) {
        odb_CircularProfile circularProfile = odb_dynamicCast(odb_CircularProfile, myProfile);
        cout << "profile name = " << myProfile.name().CStr() << " radius = " << circularProfile.r();
    }
}
Section assignments
Section assignments are stored in the sectionAssignments repository under the OdbAssembly object.
All elements in an Abaqus analysis need to be associated with section and material properties. Section assignments provide the relationship between elements in a part instance and their section properties. The section properties include the associated material name. To access the sectionAssignments repository from the PartInstance object:
odb_InstanceRepository& instanceRepository = odb.rootAssembly().instances();
odb_InstanceRepositoryIT instIT(instanceRepository);
for (instIT.first(); !instIT.isDone(); instIT.next()) {
    const odb_Instance& instance = instIT.currentValue();
    odb_SequenceSectionAssignment sectionAssignmentSeq = instance.sectionAssignments();
    int sects = sectionAssignmentSeq.size();
    cout << "Instance : " << instance.name().CStr() << endl;
    for (int s = 0; s < sects; ++s) {
        odb_SectionAssignment sa = sectionAssignmentSeq[s];
        odb_String sectionName = sa.sectionName();
        cout << "  Section : " << sectionName.CStr() << endl;
        odb_Set set = sa.region();
        const odb_SequenceElement& elements = set.elements();
        int size = elements.size();
        cout << "  Elements associated with this section : " << endl;
        for (int e = 0; e < size; ++e) cout << elements[e].label() << endl;
    }
}
Reading results data
The following list describes the objects in results data and the commands you use to read results data. As with model data you will find it useful to use the repository iterators to determine the keys of the results data repositories.
Steps
Steps are stored in the steps repository under the Odb object. The key to the steps repository is the name of the step. The following statements print out the keys of each step in the repository:
odb_StepRepositoryIT stepIter(odb.steps());
for (stepIter.first(); !stepIter.isDone(); stepIter.next()) cout << stepIter.currentKey().CStr() << endl;
The resulting output is
Step - 1 Step - 2 Step - 3Frames
Each step contains a sequence of frames, where each increment of the analysis (or each mode in an eigenvalue analysis) that resulted in output to the output database is called a frame. The following statement assigns a variable to the last frame in the first step:
odb_Step& step = odb.steps()["Step-1"];
odb_SequenceFrame& allFramesInStep = step.frames();
int numFrames = allFramesInStep.size();
odb_Frame& lastFrame = allFramesInStep[numFrames - 1];
Reading field output data
Field output data are stored in the fieldOutputs repository under the OdbFrame object. The key to the repository is the name of the variable. The following statements list all the variables found in the last frame of the first step (the statements use the variable lastFrame that we defined previously):
odb_FieldOutputRepository& fieldOutputRep = lastFrame.fieldOutputs();
odb_FieldOutputRepositoryIT fieldIter(fieldOutputRep);
for (fieldIter.first(); !fieldIter.isDone(); fieldIter.next()) cout << fieldIter.currentKey().CStr() << endl;
S U LE CSHEAR1 ASURF / BSURF CSLIP1 ASURF / BSURF CPRESS ASURF / BSURF COPEN ASURF / BSURF UR3
Different variables can be written to the output database at different frequencies. As a result, not all frames will contain all the field output variables. You can use the following to view all the available field data in a frame:
for (fieldIter.first(); !fieldIter.isDone(); fieldIter.next()) {
    odb_FieldOutput& field = fieldOutputRep[fieldIter.currentKey()];
    const odb_SequenceFieldValue& seqVal = field.values();
    const odb_SequenceFieldLocation& seqLoc = field.locations();
    cout << field.name().CStr() << " : " << field.description().CStr() << endl;
    cout << "    Type: " << field.type() << endl;
    int numLoc = seqLoc.size();
    for (int loc = 0; loc < numLoc; loc++) {
        cout << "Position: " << seqLoc.constGet(loc).position();
    }
    cout << endl;
}
The resulting print output lists all the field output variables in a particular frame, along with their type and position.
S : Stress components Type : 7 Number of fieldValues : 135 Number of locations : 1 U
    : Spatial displacement Type : 3 Number of fieldValues : 161 Number of locations : 1
In turn, a FieldOutput object has a method values that returns a reference to a sequence of FieldValue objects that contain data. Each FieldValue object in the sequence corresponds to a particular location in the model. You can obtain the data corresponding to each FieldValue object using the data method, which returns a pointer to an array that contains the results at the current location. For example,
const odb_SequenceFieldValue& displacements = lastFrame.fieldOutputs()["U"].values();
int numValues = displacements.size();
int numComp = 0;
for (int i = 0; i < numValues; i++) {
    const odb_FieldValue val = displacements[i];
    cout << "Node = " << val.nodeLabel();
    const float* const U = val.data(numComp);
    cout << ", U = ";
    for (int comp = 0; comp < numComp; comp++) cout << U[comp] << "  ";
    cout << endl;
}
The resulting output is
Node = 1 U[x] = 0.0000, U[y] = -76.4580 Node = 3 U[x] = -0.0000, U[y] = -64.6314 Node = 5 U[x] = 0.0000,
         U[y] = -52.0814 Node = 7 U[x] = -0.0000, U[y] = -39.6389 Node = 9 U[x] = -0.0000,
         U[y] = -28.7779 Node = 11 U[x] = -0.0000, U[y] = -20.3237...
The data in the FieldValue object depend on the field output variable, which is displacement in the above example. In the example above the field output for displacements was of type NODAL and there is a FieldValue object for the output at each node. In this case the data method returns a pointer to an array containing the displacements at the node. For INTEGRATION_POINT data each integration point in an element will correspond to a different FieldValue object, and the data method will return a pointer to an array containing the element results data at that particular integration point.
备注
Access to field data using the FieldValue object will be deprecated in future releases of the C++ version of the Abaqus Scripting Interface because of the improved performance of the bulk data access method. For more information, see FieldBulkData object and :[using bulk data access to an output database].
Using bulk data access to an output database
If you need to access all the data in a field from an output database, you can use the bulkDataBlocks method of the FieldOutput object to read the data in bulk form. The bulkDataBlocks method returns a reference to a sequence of FieldBulkData objects, each of which contains the entire output for a class of nodes or elements, blocked together into an array.
The data method of the FieldBulkData object returns an array of data corresponding to the output for the entire class of elements or nodes. The length and width methods of theFieldBulkData object return the number of output locations and the number of components at each output location, respectively. For example,
odb_FieldOutput& disp = lastFrame.fieldOutputs()["U"];
const odb_SequenceFieldBulkData& seqDispBulkData = disp.bulkDataBlocks();
int numDispBlocks = seqDispBulkData.size();
for (int iblock = 0; iblock < numDispBlocks; iblock++) {
    const odb_FieldBulkData& bulkData = seqDispBulkData[iblock];
    int numNodes = bulkData.length();
    int numComp = bulkData.width();
    float* data = bulkData.data();
    int* nodeLabels = bulkData.nodeLabels();
    for (int node = 0, pos = 0; node < numNodes; node++) {
        int nodeLabel = nodeLabels[node];
        cout << "Node = " << nodeLabel;
        cout << " U = ";
        for (int comp = 0; comp < numComp; comp++) cout << data[pos++] << "  ";
        cout << endl;
    }
}
The numberOfElements method returns the number of elements in a block. When you are accessing the results for elements, the numberOfElements method is useful in determining the number of output locations per element. For example, when you are accessing element data at integration points, you may need to determine the number of integration points per element. You can determine the number of integration points per element by dividing the length of the block, which is the total number of output locations, by the number of elements in the block. For example,
odb_FieldOutput& stress = lastFrame.fieldOutputs()["S"];
const odb_SequenceFieldBulkData& seqStressBulkData = stress.bulkDataBlocks();
int numStressBlocks = seqStressBulkData.size();
for (int jblock = 0; jblock < numStressBlocks; jblock++) {
    const odb_FieldBulkData& bulkData = seqStressBulkData[jblock];
    int numValues = bulkData.length();
    int numComp = bulkData.width();
    float* data = bulkData.data();
    int nElems = bulkData.numberOfElements();
    int numIP = numValues / nElems;
    int* elementLabels = bulkData.elementLabels();
    int* integrationPoints = bulkData.integrationPoints();
    const odb_SectionPoint& myBulkSectionPoint = bulkData.sectionPoint();
    int sectPoint = myBulkSectionPoint.number();
    if (sectPoint) cout << "Section Point: " << sectPoint << endl;
    cout << "Base Element type: " << bulkData.baseElementType().CStr() << endl;
    for (int elem = 0, ipPosition = 0, dataPosition = 0; elem < numValues; elem += numIP) {
        cout << "El label: " << elementLabels[elem] << endl;
        for (int ip = 0; ip < numIP; ip++) {
            cout << "Int. Point: " << integrationPoints[ipPosition++] << endl;
            cout << "S = ";
            for (int comp = 0; comp < numComp; comp++) cout << " " << data[dataPosition++] << " ";
            cout << endl;
        }
    }
}
For more information, see FieldBulkData object.
The bulkDataBlocks method is an alternative to the values method of a FieldOutput object, described in [reading field output data]. The values method of a FieldOutput object returns a reference to a sequence of FieldValue objects that contain data. Each FieldValue object in the sequence provides data for a unique location in the model.
Performance can be increased with the bulk data interface because the field data stored in a bulk data block are made available in a single array of floating point numbers. If you access the same data in nonbulk form, you must loop over a sequence of FieldValue objects and then access the data for each location separately. Traversing an array can prove to be significantly faster than traversing a sequence of objects and extracting data stored within the objects. As a result, accessing the data in an output database using the bulk data interface can be significantly faster than the nonbulk form.
If you do not need to access large amounts of data, you may get better performance with the nonbulk access method. This is especially true if the number of output locations you are accessing is smaller than the number of elements in a class. Similarly, the nonbulk access method may be faster if the number of nodes you are accessing is smaller than the number of nodes in an instance. The nonbulk access method is also better suited for random access to an output database, where successive output locations to be accessed may lie in completely different blocks.
Using regions to read a subset of field output data
After you have created an OdbSet object using model data, you can use the getSubset method to read only the data corresponding to that region. Typically, you will be reading data from a region that refers to a node set or an element set. For example, the following statements create a variable called center that refers to the node set PUNCH at the center of the hemispherical punch. In a previous section you created the displacement variable that refers to the displacement of the entire model in the final frame of the first step. Now you use the getSubset command to get the displacement for only the center region.
odb_Set& center = instance.nodeSets()["PUNCH"];
odb_FieldOutput& fieldU = lastFrame.fieldOutputs()["U"];
odb_FieldOutput centerDisp = fieldU.getSubset(center);
const odb_SequenceFieldValue& centerValues = centerDisp.values();
const odb_FieldValue val = centerValues.value(0);
const float* const data = val.data(numComp);
cout << " Node: " << val.nodeLabel() << endl;
cout << " U = ";
for (int comp = 0; comp < numComp; comp++) cout << data[comp] << "  ";
cout << endl;
The resulting output is
Node : 1000 U = 0.0000 - 76.4555
The arguments to getSubset are a region, an element type, a position, or section point data. The following is a second example that uses an element set to define the region and generates formatted output for the stress at integration points for CAX4 elements from the element set “CENT”:
odb_Set& topCenter = instance.elementSets()["CENT"];
odb_Step& step2 = odb.steps()["Step-2"];
odb_String CAX4 = "CAX4";
odb_FieldOutput& stressField = step2.frames(3).fieldOutputs()["S"];
odb_FieldOutput fieldCAX4 = stressField.getSubset(CAX4);
odb_FieldOutput fieldIP = fieldCAX4.getSubset(odb_Enum::INTEGRATION_POINT);
odb_FieldOutput fieldTopCenter = fieldIP.getSubset(topCenter);
const odb_SequenceFieldValue& vals = fieldTopCenter.values();
int valSize = vals.size();
int dSize = 0;
for (int l = 0; l < valSize; l++) {
    const odb_FieldValue val = vals[l];
    cout << "Element label = " << val.elementLabel();
    cout << " Integration Point = " << val.integrationPoint();
    cout << endl;
    const float* const data = val.data(dSize);
    cout << " S : ";
    for (int k = 0; k < dSize; k++) {
        cout << data[k] << " ";
    }
    cout << endl;
}
The resulting output is
Element label = 1 Integration Point =
    1 S : 0.01230 - 0.05658 0.00892 - 0.00015 Element label = 1 Integration Point =
        2 S : 0.01313 - 0.05659 0.00892 - 0.00106 Element label = 1 Integration Point =
            3 S : 0.00619 - 0.05642 0.00892 - 0.00023 Element label = 1 Integration Point =
                4 S : 0.00697 - 0.05642 0.00892 - 0.00108 Element label = 11 Integration Point =
                    1 S : 0.01281 - 0.05660 0.00897 - 0.00146 Element label = 11 Integration Point =
                        2 S : 0.01183 - 0.05651 0.00897 - 0.00257 Element label = 11 Integration Point = 3 ...
Possible values for the enumeration for the position are:
INTEGRATION_POINT
NODAL
ELEMENT_NODAL
CENTROID
If the requested field values are not found in the output database at the specified odb_Enum::ELEMENT_NODAL or odb_Enum::CENTROID positions, they are extrapolated from the field data at the odb_Enum::INTEGRATION_POINT position.
Reading history output data
History output is output defined for a single point or for values calculated for a portion of the model as a whole, such as energy. Depending on the type of output expected, the historyRegions repository contains data from one of the following:
a node
an integration point
a region
a material point
备注
History data from an analysis cannot contain multiple points.
The history data object model is shown in 图 35.
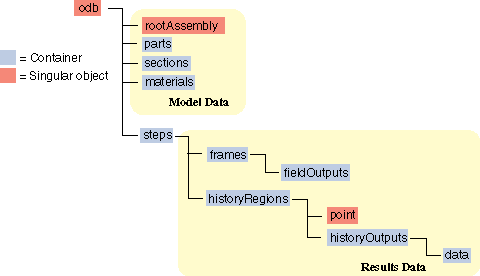
图 35 The history data object model.
In contrast to field output, which is associated with a frame, history output is associated with a step. History output data are stored in the historyRegions repository under an OdbStep object. Abaqus creates keys to the historyRegions repository that describe the region; for example,
'Node PART-1-1.1000''Element PART-1-1.2 Int Point 1''Assembly ASSEMBLY'
The output from all history requests that relate to a specified point is collected in one HistoryRegion object. A HistoryRegion object contains multiple HistoryOutput objects. Each HistoryOutput object, in turn, contains a sequence of (frameValue, value) sequences. In a time domain analysis (domain = TIME) the sequence is a tuple of (stepTime, value). In a frequency domain analysis (domain = FREQUENCY) the sequence is a tuple of (frequency, value). In a modal domain analysis (domain = MODAL) the sequence is a tuple of (mode, value).
In the analysis that generated the Abaqus/CAE Visualization module tutorial output database, the user asked for the following history output:
At the rigid body reference point (Node 1000)
U
V
A
At the corner element
MISES
LE22
S22
The history output data can be retrieved from the HistoryRegion objects in the output database. The tutorial output database contains HistoryRegion objects that relate to the rigid body reference point and the integration points of the corner element as follows:
'Node PART-1-1.1000''Element PART-1-1.1 Int Point 1''Element PART-1-1.1 Int Point 2''Element PART-1-1.1 Int Point 3''Element PART-1-1.1 Int Point 4'
The following statements read the tutorial output database and write the U2 history data from the second step to an ASCII file that can be plotted by Abaqus/CAE:
odb_Step& step = odb.steps()["Step-2"];
odb_Instance& instance = odb.rootAssembly().instances()["PART-1-1"];
odb_Set& nSet = instance.nodeSets()["PUNCH"];
const odb_Node node = nSet.nodes().constGet(0);
odb_HistoryPoint hPoint(node);
odb_HistoryRegion& histRegion = step.getHistoryRegion(hPoint);
odb_HistoryOutputRepository& hoCon = histRegion.historyOutputs();
odb_HistoryOutput& histOutU2 = hoCon["U2"];
odb_SequenceSequenceFloat data = histOutU2.data();
int numHDat = data.size();
for (int i = 0; i < numHDat; i++) {
    odb_SequenceFloat pair = data[i];
    cout << pair.constGet(0) << " " << pair.constGet(1) << endl;
}
The output in this example is a sequence of tuples containing the frame time and the displacement value. The example uses nodal history data output. If the analysis requested history output from an element, the output database would contain one HistoryRegion object and one HistoryPoint object for each integration point.
An example of reading field data from an output database
The following program illustrates how you read model data and field output data from the output database used by the Abaqus/CAE Visualization module tutorial output database.
Import the required modules:
#include <iostream.h>
#include <odb_API.h>
Open the output database used by the tutorial.
odb_Odb& odb = openOdb("viewer_tutorial.odb");
Create a variable that refers to the last frame of the first step.
odb_Step& step = odb.steps()["Step-1"];
odb_SequenceFrame& allFramesInStep = step.frames();
int numFrames = allFramesInStep.size();
odb_Frame& lastFrame = allFramesInStep[numFrames - 1];
Create a variable that refers to the displacement ‘U’ in the last frame of the first step.
odb_FieldOutput& displacements = lastFrame.fieldOutputs().get("U");
Create a variable that refers to the node set ‘PUNCH’ in the part instance’PART-1–1’ :
odb_Instance& instance = odb.rootAssembly().instances()["PART-1-1"];
odb_Set& nodeSet = instance.nodeSets()["PUNCH"];
Create a variable that refers to the displacement of the node set in the last frame of the first step:
odb_FieldOutput myDisplacements = displacements.getSubset(nodeSet);
Finally, print some field output data from each node in the node set (a single node in this example).
const odb_FieldValue val = myDisplacements.values()[0];
const float* const data = val.data(numComp);
cout << " Node: " << val.nodeLabel() << endl;
cout << " U = ";
for (int comp = 0; comp < numComp; comp++) cout << data[comp] << "  ";
cout << endl;
cout << " Magnitude = " << val.magnitude();
The resulting output is
Node : 1000 U = 0.0000, -76.4554 Magnitude = 76.4554